
12.11.2023
Outdoor Unit: Comprehensive Ductless Mini Split Installation Guide Explained
The outdoor unit of a ductless mini split system is a crucial component that plays a significant role in the overall functioning of the system. This article provides a comprehensive glossary on the installation of the outdoor unit of a ductless mini split system. The objective is to provide a detailed understanding of the process, the components involved, and the technicalities that need to be addressed during the installation. Understanding the installation process is essential for both professionals in the field and homeowners who wish to have a deeper understanding of the system they are investing in. The information provided here is detailed and technical, aiming to cover all aspects of the installation process.
Table of Contents:

Outdoor Unit: Ductless Mini Split
Understanding the installation process is essential for both professionals in the field and homeowners who wish to have a deeper understanding of the system they are investing in.
Understanding the Outdoor Unit
The outdoor unit, also known as the condenser unit, is a key part of a ductless mini split system. It houses several important components, including the compressor, the condenser coil, and the fan. The outdoor unit is responsible for expelling the heat absorbed from the indoor air to the outside environment. It is crucial to understand the role and function of the outdoor unit before proceeding with the installation. This knowledge helps in ensuring a proper installation process and the efficient operation of the system.
Components of the Outdoor Unit
The outdoor unit of a ductless mini split system consists of several components, each with a specific function. The compressor is the heart of the system, responsible for pumping refrigerant through the system. The condenser coil facilitates the release of heat, and the fan helps in dissipating this heat into the outside environment. Other components include the reversing valve, which allows the system to switch between cooling and heating modes, and the service valves, which provide access points for servicing the system. Understanding these components and their functions is crucial for a successful installation.
Role of the Outdoor Unit in a Ductless Mini Split System
The outdoor unit plays a crucial role in the operation of a ductless mini split system. It is responsible for the heat exchange process, which is the core function of any HVAC system. The outdoor unit expels the heat absorbed from the indoor air, thereby cooling the indoor environment in the summer. In the winter, the process is reversed, with the outdoor unit absorbing heat from the outdoor air and transferring it indoors. This dual function makes the outdoor unit a vital component of a ductless mini split system.
Pre-Installation Considerations
Before proceeding with the installation of the outdoor unit, there are several factors to consider. These include the location of the unit, the distance from the indoor unit, the availability of electrical connections, and the local building codes and regulations. Choosing the right location for the outdoor unit is crucial. It should be placed in a location that allows for adequate airflow and is easily accessible for maintenance. The distance from the indoor unit should also be considered, as it affects the efficiency of the system.
Location of the Outdoor Unit
The location of the outdoor unit is a critical factor in the installation process. It should be placed in a location that allows for adequate airflow, is easily accessible for maintenance, and is not in direct sunlight. The unit should also be placed on a stable and level surface to ensure proper operation. It is also important to consider the noise level of the unit when choosing a location. While ductless mini split systems are generally quiet, the outdoor unit does produce some noise during operation. Therefore, it should be placed in a location that minimizes noise disturbance to the occupants of the house and the neighbors.
Distance from the Indoor Unit
The distance between the outdoor unit and the indoor unit is another important consideration. The refrigerant lines that connect the two units should be as short as possible to maximize the efficiency of the system. However, the distance should not be so short that it compromises the ability to service the units or violates local building codes. It is also important to consider the vertical distance between the units, especially if the outdoor unit is being installed on a roof or a high platform. The vertical lift should be within the limits specified by the manufacturer to ensure proper operation of the system.
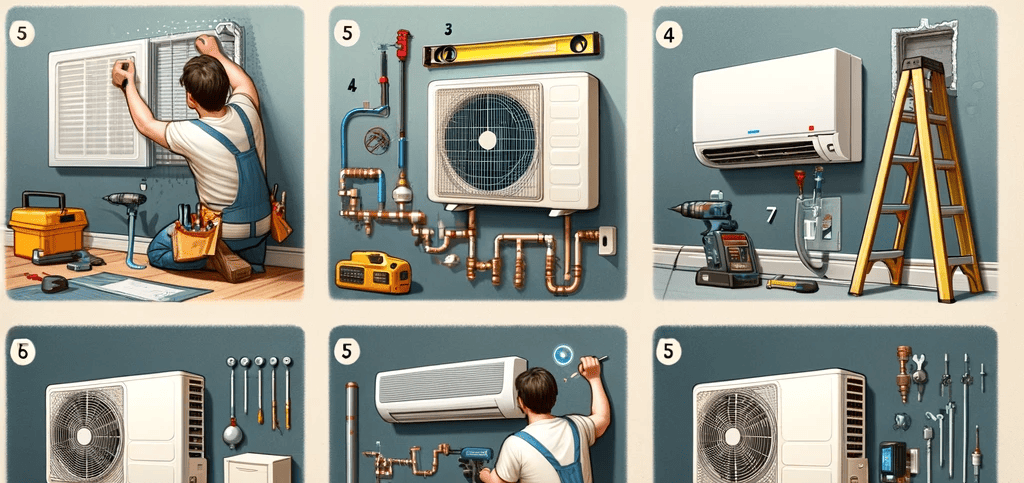
Installation Process
The installation process of the outdoor unit involves several steps, including mounting the unit, connecting the refrigerant lines, and making the electrical connections. Each step should be carried out carefully and in accordance with the manufacturer's instructions to ensure a successful installation. It is recommended to have a professional HVAC technician perform the installation, as it involves handling refrigerants and electrical connections, which can be hazardous if not done correctly. However, understanding the process can help homeowners oversee the installation and ensure it is done correctly.
Mounting the Outdoor Unit
The first step in the installation process is mounting the outdoor unit. The unit should be placed on a stable and level surface, such as a concrete pad or a wall-mounted bracket. The unit should be secured using the appropriate hardware to ensure it remains stable during operation. The unit should be positioned in a way that allows for adequate airflow and is easily accessible for maintenance. The location should also be chosen to minimize noise disturbance and avoid direct sunlight.
Connecting the Refrigerant Lines
Once the outdoor unit is securely mounted, the next step is to connect the refrigerant lines. These lines connect the outdoor unit to the indoor unit and allow for the flow of refrigerant between the two. The lines should be connected in accordance with the manufacturer's instructions, and the connections should be secured tightly to prevent any leaks. The refrigerant lines should be insulated to prevent heat loss and protect them from the elements. The lines should also be installed in a way that allows for easy access for maintenance and repairs.
Making the Electrical Connections
The final step in the installation process is making the electrical connections. The outdoor unit requires a dedicated electrical circuit, and the wiring should be done in accordance with the local building codes and the manufacturer's instructions. The electrical connections should be secured tightly to ensure a safe and reliable operation. Once the electrical connections are made, the system should be tested to ensure it is operating correctly.
Post-Installation Considerations
Once the outdoor unit is installed, there are several post-installation considerations to keep in mind. These include regular maintenance of the unit, troubleshooting any issues that may arise, and understanding the warranty and service options. Regular maintenance of the outdoor unit is crucial for the efficient operation of the system. This includes cleaning the condenser coil, checking the refrigerant level, and inspecting the electrical connections. Any issues that arise should be addressed promptly to prevent further damage to the system.
Maintenance of the Outdoor Unit
Regular maintenance of the outdoor unit is crucial for the efficient operation of the ductless mini split system. This includes cleaning the condenser coil to remove any dirt or debris that may have accumulated, which can affect the heat exchange process and reduce the efficiency of the system. The refrigerant level should also be checked regularly to ensure it is within the recommended range. A low refrigerant level can affect the cooling capacity of the system and lead to higher energy consumption. The electrical connections should also be inspected for any signs of wear or damage, and any issues should be addressed promptly.
Troubleshooting and Repairs
If any issues arise with the outdoor unit, it is important to troubleshoot the problem and carry out the necessary repairs. Common issues include a noisy operation, reduced cooling capacity, or the unit not turning on. Each of these issues can be caused by a variety of factors, and it is important to identify the root cause before proceeding with the repairs. It is recommended to have a professional HVAC technician carry out the repairs, as they have the necessary skills and tools to do the job correctly. However, understanding the common issues and their causes can help homeowners identify when a repair is needed and ensure it is done correctly.
Warranty and Service Options
Most outdoor units come with a warranty that covers defects in materials and workmanship. It is important to understand the terms of the warranty and the process for making a claim. Some manufacturers also offer extended warranties or service contracts that provide additional coverage beyond the standard warranty. Understanding the service options available for the outdoor unit can also be beneficial. This includes knowing who to contact for repairs, the cost of service calls, and the availability of replacement parts. Having this information can help homeowners make informed decisions when it comes to maintaining and servicing their outdoor unit.
Conclusion
The installation of the outdoor unit of a ductless mini split system is a complex process that involves several steps and considerations. Understanding this process can help ensure a successful installation and the efficient operation of the system. While it is recommended to have a professional HVAC technician perform the installation, homeowners can benefit from understanding the process and the considerations involved. This knowledge can help them oversee the installation, ensure it is done correctly, and maintain the system effectively. Ready to experience the pinnacle of climate control with a ductless mini split system? Don't just read about the installation process—let our expert technicians ensure your system is installed to perfection. Schedule your service today and join the Richair Comfort family, where your comfort is our top priority.
Back Home - Richair Comfort Solution - Ductless Mini Split Systems Top Quality Installations and Professional Service.
Was This Article Helpful?
RECENT POSTS